站长资源平面设计
Photoshop制作复古的橙色霓虹灯发光字
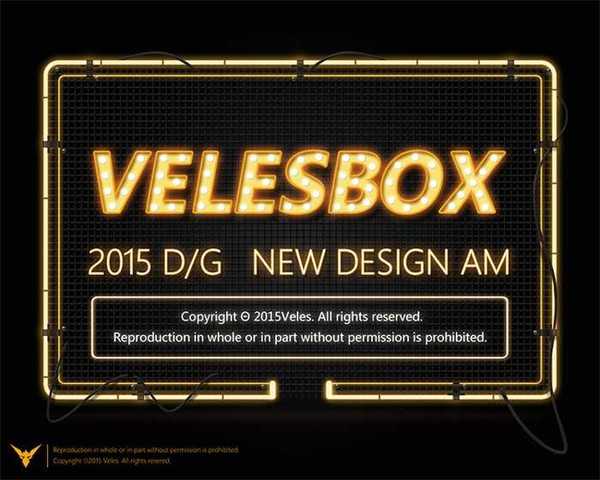
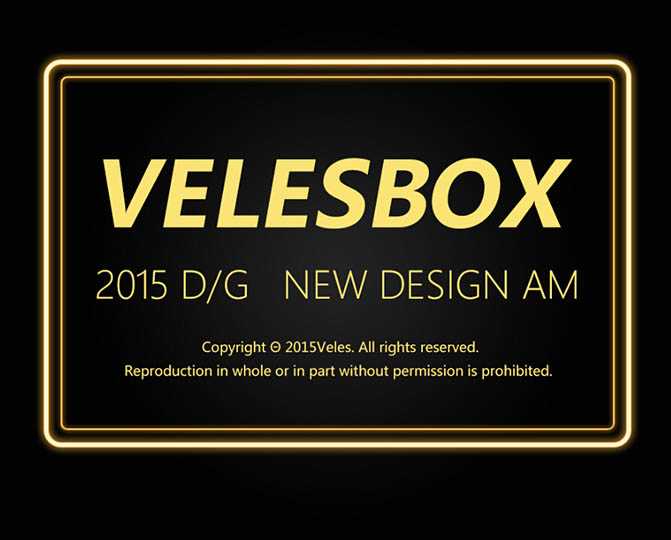
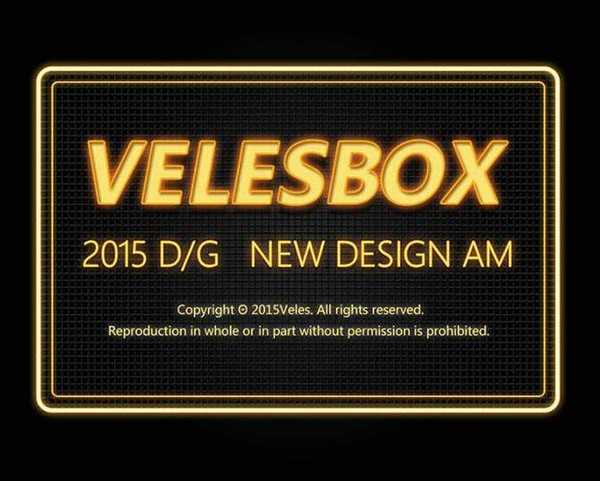
简介效果图是作者设计的霓虹海报,其中包括了背景、边框、霓虹字、电线等。文字部分制作比较经典,不同的文字用了不同的图层样式,局部还添加一些小装饰,这样画面就非常丰富,生动。最终效果1、新建画板 宽度(W):1000像素*高度(H):800像素,分辨率(R):72像素/英寸,颜色模式:RGB颜色 8位,背景
效果图是作者设计的霓虹海报,其中包括了背景、边框、霓虹字、电线等。文字部分制作比较经典,不同的文字用了不同的图层样式,局部还添加一些小装饰,这样画面就非常丰富,生动。
最终效果
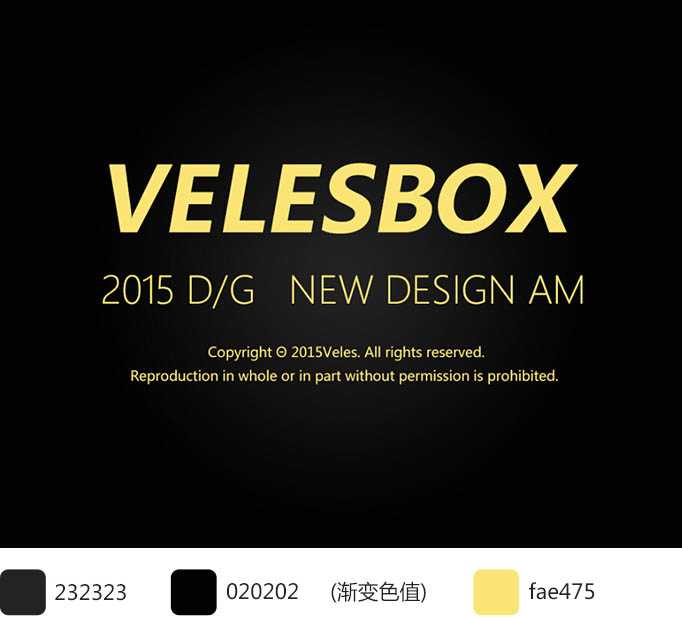
1、新建画板 宽度(W):1000像素*高度(H):800像素,分辨率(R):72像素/英寸,颜色模式:RGB颜色 8位,背景:白色。
2、快捷键(T)输入文字,文字填充基础色黄色,色值:fae475,底色填充黑色渐变。
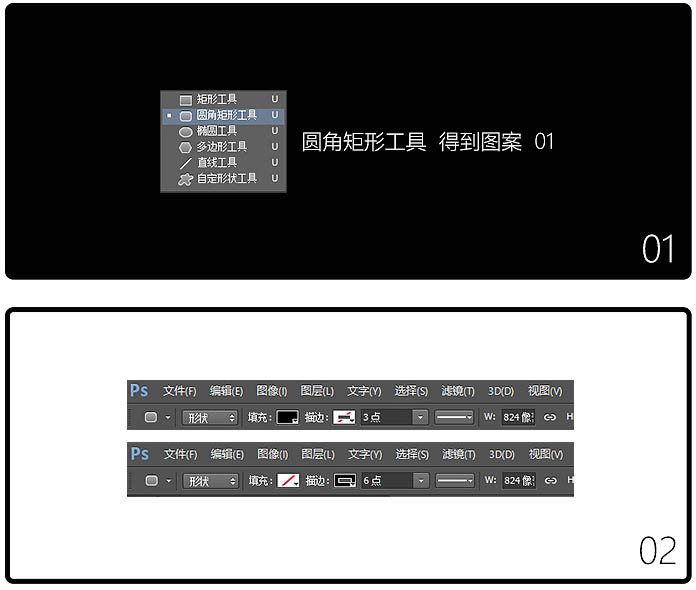
3、新建2个空心矩形,分别命名:(外框)(内框),不知道空心矩形如何设置?那一步一步说一下吧~ 把上面的参数调成下面的就可以得到边为6点的空心矩形(外框);同理制作一个小一些的(内框)边为3点。
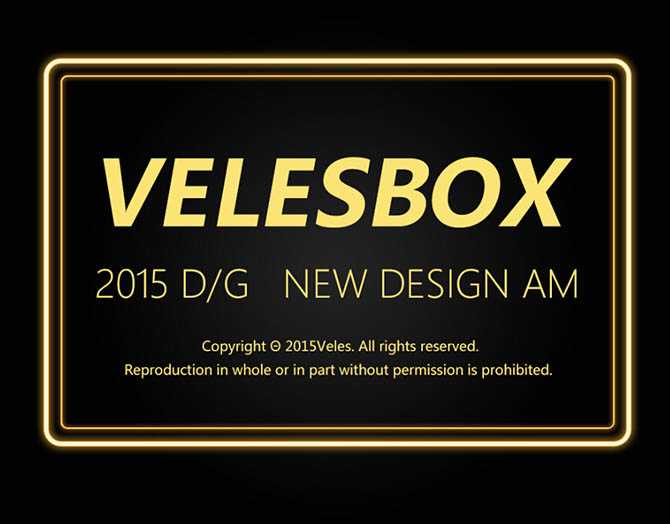
4、基本图形已经弄出来了,下面准备开始弄效果,就是混合选项的设置。先看看效果先如下。
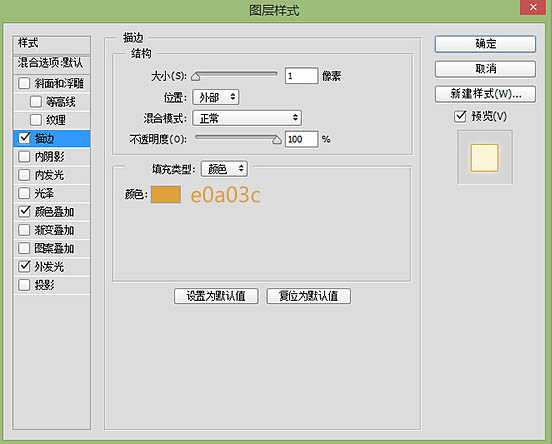
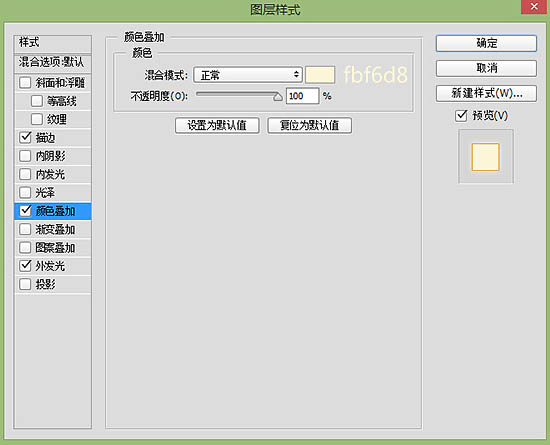
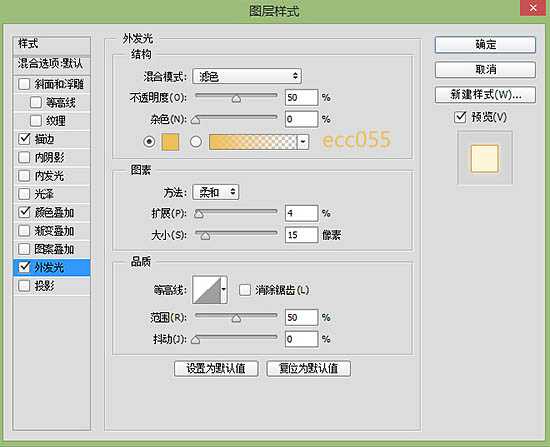
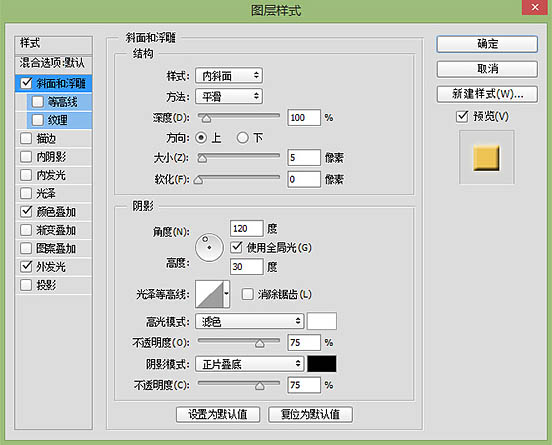
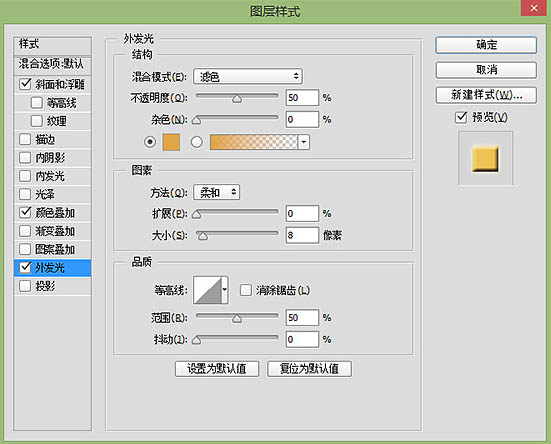
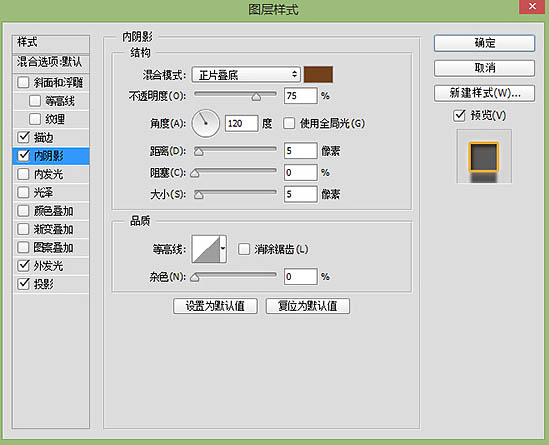
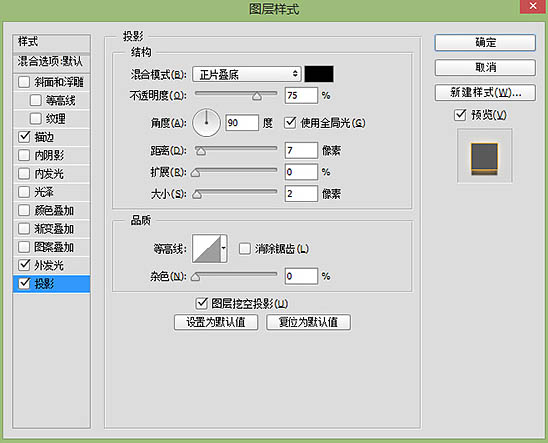
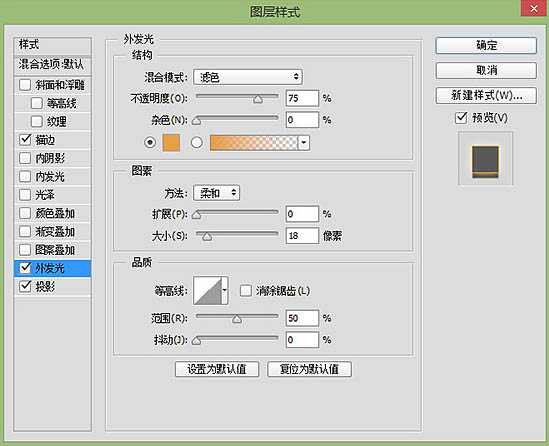
5、图层样式如下:用到描边,颜色叠加,外发光,斜面和浮雕。
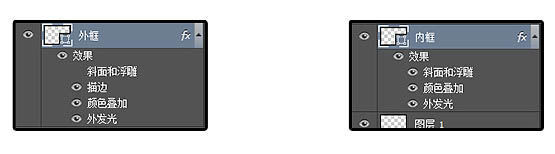
6、外框混合图层具体参数如下。
7、内框混合图层具体参数如下。

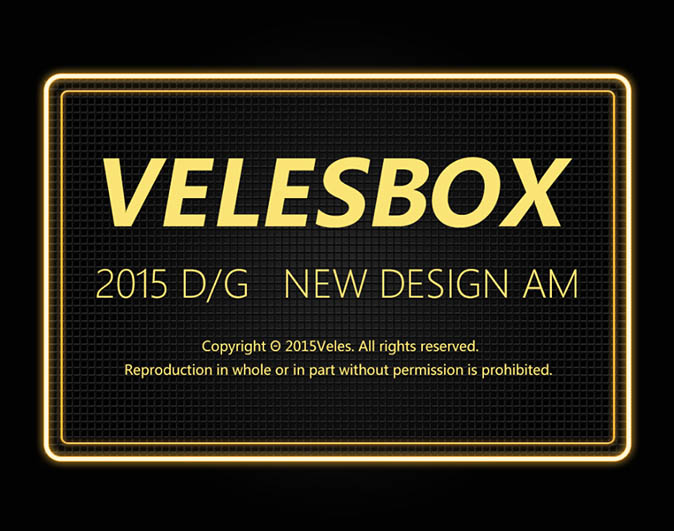
8、在背景下面增加一个铁丝网,让荧光字在铁丝网上面,增加一些质感,效果如下图。
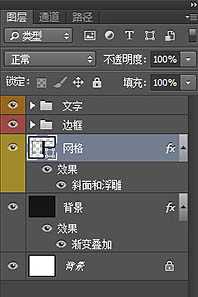
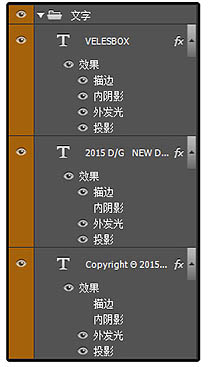
9、此时你的图层是不是这样的?好吧一定要有整理的习惯好好分类。
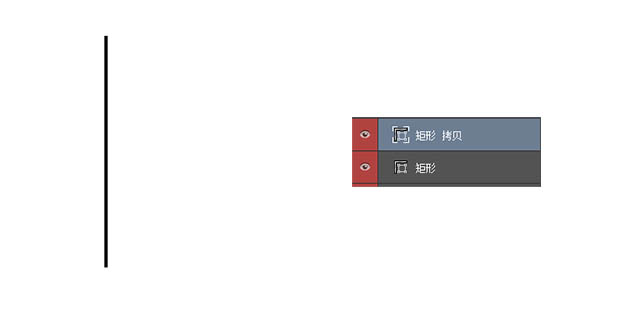
10、我继续说说制作网格的原理~~其实就是傻瓜式的。新建一个长方形矩形,然后快捷键(CTRL+J) 复制一层,这时你的图层会多了一个矩形拷贝的图层,对不对。
11、点击图层矩形拷贝(CTRL+T)一下,然后按着SHIT键再按一下方向键向右移动(移动多少距离你们随意,我移动了两下)。
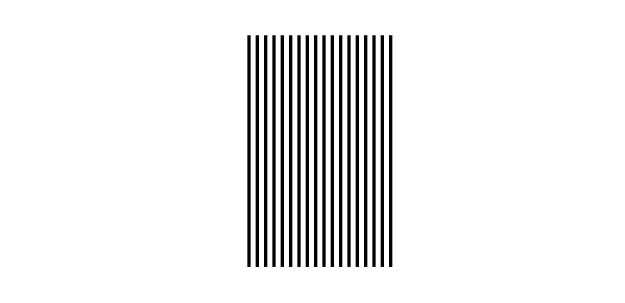
12、然后按下回车键!最后,历史时刻!按下shit+ctrl+alt+t ,按一下你发现多一层,最后形成下边的样子,对不对。最后通过上述方法得到这个网 。

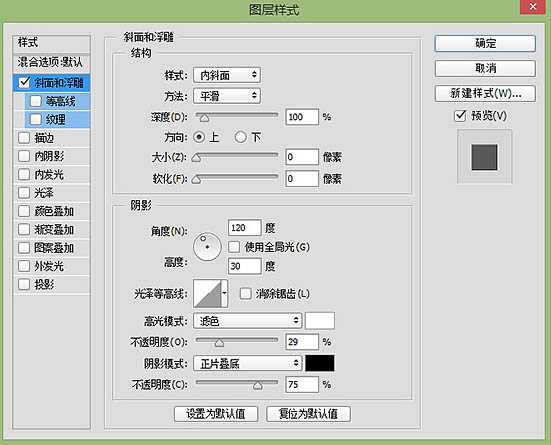
13、右键点击这个网的图层 – 混合选项,设置一些参数如图。

14、这时到做字体质感样式的时候啦~先看看下面的效果图。
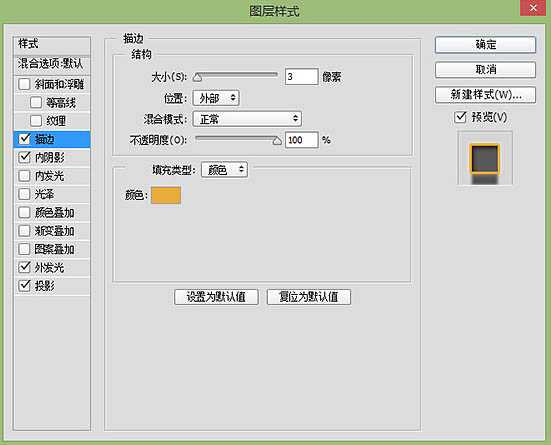
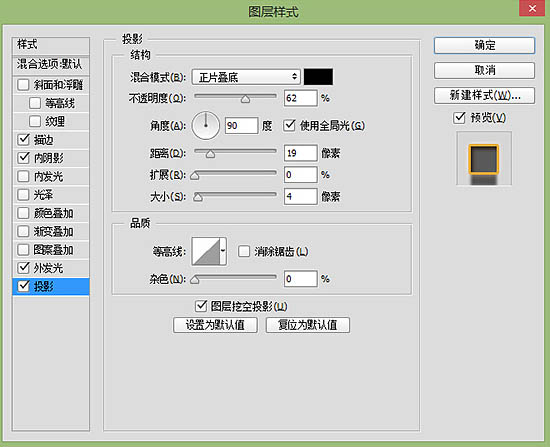
15、VELESBOX调节参数。

16、2015 D&G 调节参数。

上一页12 下一页 阅读全文
最终效果
1、新建画板 宽度(W):1000像素*高度(H):800像素,分辨率(R):72像素/英寸,颜色模式:RGB颜色 8位,背景:白色。
2、快捷键(T)输入文字,文字填充基础色黄色,色值:fae475,底色填充黑色渐变。
3、新建2个空心矩形,分别命名:(外框)(内框),不知道空心矩形如何设置?那一步一步说一下吧~ 把上面的参数调成下面的就可以得到边为6点的空心矩形(外框);同理制作一个小一些的(内框)边为3点。
4、基本图形已经弄出来了,下面准备开始弄效果,就是混合选项的设置。先看看效果先如下。
5、图层样式如下:用到描边,颜色叠加,外发光,斜面和浮雕。
6、外框混合图层具体参数如下。
7、内框混合图层具体参数如下。
8、在背景下面增加一个铁丝网,让荧光字在铁丝网上面,增加一些质感,效果如下图。
9、此时你的图层是不是这样的?好吧一定要有整理的习惯好好分类。
10、我继续说说制作网格的原理~~其实就是傻瓜式的。新建一个长方形矩形,然后快捷键(CTRL+J) 复制一层,这时你的图层会多了一个矩形拷贝的图层,对不对。
11、点击图层矩形拷贝(CTRL+T)一下,然后按着SHIT键再按一下方向键向右移动(移动多少距离你们随意,我移动了两下)。
12、然后按下回车键!最后,历史时刻!按下shit+ctrl+alt+t ,按一下你发现多一层,最后形成下边的样子,对不对。最后通过上述方法得到这个网 。
13、右键点击这个网的图层 – 混合选项,设置一些参数如图。
14、这时到做字体质感样式的时候啦~先看看下面的效果图。
15、VELESBOX调节参数。
16、2015 D&G 调节参数。
上一页12 下一页 阅读全文